As a test engineer, it is very important to understand the difference between Bar Gauge and Bar Absolute, as you may find yourself testing either with the same set of test equipment. Confusion between the two, especially during calibration, can cause significant errors during the test which can’t be rectified easily.
Pressure Values and Saturated Steam Temperature
There are several sections in IPReports where the pressure units are critical for calculations, the most significant of which is the saturated steam value.
When data is imported into the Porous Load Thermometric Test, IPReports calculates the theoretical saturated steam temperature from the imported pressure value, and deducts the temperature recorded by the sensor probe to give the difference between the two. This value is therefore entirely dependent on having correctly named probes (the Drain/Sensor and Pressure), and correct units for both.
A missing probe name will result in a temperature difference of ~134°C (as a steam temperature of 134 – drain temperature of 0 = 134)
Using incorrect units will result in a difference of:
~12°C if gauge and absolute are confused

~600°C if millibar and bar are confused

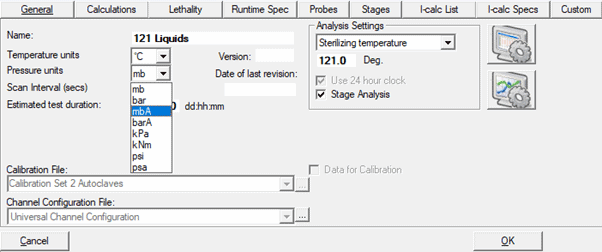
This can, however, be remedied by changing the pressure Units in the Test Details of the cycle in TQSoft

Click OK and save changes, and then reimport into IPReports

Bar Gauge vs Bar Absolute – what’s the difference?
Bar Gauge (or just ‘Bar’) is open to the atmosphere and uses atmospheric pressure as its base value – your pressure calibrator is therefore zeroed before testing. ‘Ambient’ will read 0, a vacuum will read as a negative (e.g -0.5bar), and pressure will read as a positive (e.g. 2.2bar). Recommended TQSoft settings would be a low of -0.9bar, high of 2.5bar and checkpoint of 2.2bar.
Bar Absolute (frequently BarA or BA) is based on a sealed unit, set to a nominal absolute vacuum. Zero in this case would be a complete vacuum, and at ‘ambient’ the reading on the display will be a true atmospheric pressure (usually between 970 and 1020 mb at sea level in the UK). A vacuum will read as e.g. 0.5bar (note this is positive not negative value, but below the atmospheric pressure), and pressure values will read approximately 1 bar higher than bar gauge, as the baseline is atmospheric pressure rather than zero.
If you have an accurate reading of the daily atmospheric pressure on site, you can use this as an offset to your calculations , but although we were all taught at school that atmospheric pressure is 1000millibar, and the difference between gauge and absolute readings is therefore approximately 1000 mB you would very rarely simply add a thousand to a gauge reading to get an absolute reading. By doing this you are creating an error due to the difference between the atmospheric pressure of the day and 1000mb, which could be up to 30mb. As well as creating an error of measurement which could lead to a false positive or negative result during testing, this can also lead to some strange results in testing, such as the measured pressure during negative pulsing dropping below 0 Bar Absolute – a physical impossibility which is likely to be picked up by an auditor!
One other frequent mistake is mentally adjusting Bar to Bar Absolute at one end of the scale only while calibrating (e.g. calibrating between 0.5 and 2.5 Bar Absolute or -0.5 and 3.5 Bar Gauge), or missing the positive/negative symbol from the low point (and calibrating at +0.5 rather than -0.5). This can lead to the calibration being accurate at one end of the scale, but significantly out (by about 1 bar) at the other. This can generally only be rectified by recalibrating and retesting.
It is also worth noting that Bar Gauge pressure calibrators are set up and calibrated to be zeroed to atmospheric pressure. A Bar Absolute calibrator has internal offsets and is calibrated to be completely independent of atmospheric pressure, and should normally be locked to prevent the user changing these settings. If the reading is zeroed so that at ambient the reading is zero, the internal offsets can still remain, and cause inaccuracies as well as removing all calibration settings. The unit should therefore be viewed as not calibrated, and further inaccuracies may also have been introduced. The unit should be recalibrated, and locked to prevent changes being made.
A perfect solution for use in performing pre and post calibration checks when validating decontamination processes. Available to purchase in Bar Absolute or Bar Gauge.
Fitting Type:
• BSP Fittings
• NPT Fittings
